
I am something of an old-fashioned kind of girl. I make my own bread and use herbs instead of medication whenever I can, and I do as much from scratch as humanly possible. But out of all of my old-fashioned quirks, easily the one that gets the most shocked responses is the fact that I don't watch TV and I recently cancelled my Netflix subscription. I don't have Hulu either. In fact, I hate television shows. And, while that might sound shocking, I have to say that lessening my time watching TV ... [ Read More ]
5 Mistakes Everyone Makes With Their First Coop
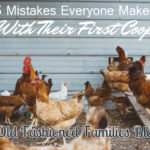
So you've made the jump and decided to get chickens? Congratulations! Chickens are a fantastic addition to any homestead. Not only do they provide delicious meat and eggs for the family, but they're an absolute riot and will help control things like bugs as well. There are tons of benefits of having chickens, in fact. However, if you've never had chickens before, then you're in the right place! Whenever you create your first chicken coop, there are a handful of mistake that virtually everyone ... [ Read More ]
Grandma’s Classic Chocolate Chip Cookie Recipe

If I had to pick one thing to describe my childhood, it would have to be chocolate chip cookies. We always had chocolate chip cookies around the house because my father absolutely loved them. And they were always made from scratch—in fact, I can't eat store bought cookies. They just don't taste right. When I was a teenager, my mother taught me how to make some of these classic chocolate chip cookies (a recipe from my grandmother) and I've been making them for my family and friends ever since. ... [ Read More ]
8 Old Fashioned Tips for Saving Money

Although 'frugal' has become something of a dirty word recently, the truth of the matter is that our grandparents were actually very frugal and careful with their money. Money was often a little tight, and it paid to be careful with where your money went. Sound familiar? If you're looking for some ways to save a bit of money, here are some tried-and-true old-fashioned methods for spending less: 1. Make what you can at home Why spend money when you can make things at home for half the cost? Not ... [ Read More ]
DIY Homemade All-Purpose Cleaner

I am a huge proponent of using as few chemicals as possible. It seems like no matter what you do, everything has chemicals added these days. One of the worst culprits has to be cleaners. We've talked before about making your own household cleaners, laundry supplies, and kitchen and bathroom cleaners, but sometimes you just need a good all-purpose cleaner to wipe things down. I did a lot of research into all-purpose cleaners and tried a bunch of them to see which ones worked best, and this ... [ Read More ]
How to Make Washing Soda from Baking Soda
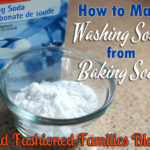
My whole family is pretty old-fashioned when it comes to most things. My parents garden and we all cook from scratch and work towards being more sustainable with our water and energy consumption. However, one thing that I haven't convinced the rest of my family to do is switch to homemade cleaning products. This is mostly because the list of ingredients you need is long and some of it is a little hard to find where I live. However, while some of it you can't get around purchasing (I have yet ... [ Read More ]
10 Signs You Had an Old-Fashioned Childhood

No one can deny that the world is very different now than it was even 20 years ago, and the further back you go, the bigger the differences in parenting are. However, there's something awesome to be said for an old-fashioned childhood. I know I was lucky enough to grow up in the country with an old-fashioned family and those values and memories have stuck with me my whole life. Here are 10 signs that you, or perhaps your children, had an old-fashioned childhood: 1. You drank water straight ... [ Read More ]
5 Old-Fashioned Housekeeping Tips from Grandma
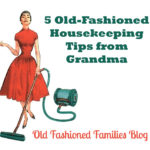
My grandma is a very clever lady. She grew up on a farm and raised three little girls, a ton of pigs, and dozens of other animals at home. She was entirely in charge of the household and did all of the cooking, cleaning, child-rearing, and even quite a bit of the chores around the home while my grandfather worked and did the jobs around the house. So, obviously, she had a lot of tricks and tips to help get everything done. Now, some of these tips are common sense things we still do today ... [ Read More ]
Things to Plant to Attract Butterflies and Bees to Your Yard

Growing up in the country, I sort of took bees and butterflies for granted. My mother planted a lot of different flowers which attracted both to our yard. The biggest culprits for all the butterflies were two gigantic lilac bushes in the back yard. However, there aren't as many butterflies around my house now, and I can't remember the last time I saw more than one bee at a time. So, being the nature-oriented person I am, I decided to look into what plants tend to attract such insects, and lo ... [ Read More ]