
If I had to pick one thing to describe my childhood, it would have to be chocolate chip cookies. We always had chocolate chip cookies around the house because my father absolutely loved them. And they were always made from scratch—in fact, I can't eat store bought cookies. They just don't taste right. When I was a teenager, my mother taught me how to make some of these classic chocolate chip cookies (a recipe from my grandmother) and I've been making them for my family and friends ever since. ... [ Read More ]
8 Tips for Making the Best Grilled Cheese Ever
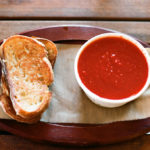
When I was a child, grilled cheese was one of my favorite foods. There's just something comforting about that delicious gooey cheese oozing from between two slices of golden and crispy bread. It warms your heart and sometimes burns your mouth and just tastes like heaven. And, even better, grilled cheese is one of this ridiculously simple dishes that is always a hit with kids. Most adults won't turn one down either, and anyone can make one. You really can't go wrong. However, if you're a ... [ Read More ]
Easy Garlic Basil Fries

No matter how you cook them, I think potatoes are some of my favorite foods. However, by far my favorite way to eat potatoes has to be in the form of fries. It's faster than making a baked potato, but much healthier than pan frying or deep frying. Also, it's delicious!! This recipe I made after realizing that I had far too many red potatoes and they needed to be used before they started going bad. The store had a sale on them, so I purchased a ten pound bag a while back. Fortunately, these ... [ Read More ]
Homemade Pita Bread
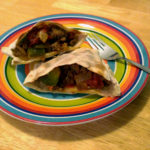
Pita bread is delicious and ridiculously versatile. It is great for leftovers as you can stuff pita bread with just about anything you can imagine. And, much like any other homemade bread, store bought pita bread doesn't even compare to making it at home. Without a doubt, my favorite thing about pita bread is how ridiculously versatile it is. You can take it with you, you can stuff it with just about anything you can imagine. The bread can also be made ahead of time and either refrigerated ... [ Read More ]
Old-Fashioned Pancake Recipe

There are two kinds of people in the world: those who like waffles, and those who like pancakes. Personally, I'm a pancake person. Not to say that I won't enjoy a good old-fashioned waffle from a waffle iron, but I find that pancakes are far more versatile, forgiving, and much simpler to cook. While there are dozens of different ways to make pancakes, it all starts with my basic old-fashioned pancake recipe. From there, you can add whatever you like: strawberries, blueberries, cinnamon, ... [ Read More ]
Simple and Easy Chili Recipe

When it's cold outside, nothing beats a bowl of chili with some cheese and crackers. Absolutely nothing. When I was little, we ate a lot of chili during the winter months, not only because it is delicious, but also because it goes a long way and can be reused a million different ways. This recipe is one that my father uses when he didn't have time to let the chili simmer for hours and hours on the stove, and personally I kind of like the simplicity of it. Here's the recipe: Simple and ... [ Read More ]
Spicy Buffalo Chicken Dip Recipe

I'm a sucker for hot dishes during the winter, anything from chili, to soup, to delicious and warm dips. Plus, all of those things can usually be made in a crock pot, which makes prep time minimal and the whole process pretty simple. With that being said, with winter in full swing here, I've been on a bit of a dip kick. While I have been experimenting with different dips more and more, my personal favorite remains buffalo chicken dip, so I thought I would share the recipe! Buffalo Chicken ... [ Read More ]
5 Simple Salad Dressing Recipes

There is no reason to ever spend your hard earned dollars on store-bought salad dressing ever again. These recipes are so simple that it won't take much longer than opening the bottle of dressing to make, and you'll be able to memorize the recipes after giving it a couple go's. Aside from the issue of price, salad dressings are usually pumped full of chemical additives, sugar, and salt. By making your own you can really monitor what ingredients you are putting into your body, and adjust the ... [ Read More ]
Creamy Potato Soup Recipe
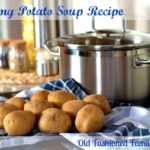
I went home to visit my mom this past weekend, and I bugged her a little bit to pass on some of her kitchen wisdom. While I was aiming for some more difficult stuff, what exactly I'm not quite sure, she decided to give me a classic instead— her creamy potato soup recipe! I absolutely love my moms potato soup, it's perfectly rich and creamy and overall just delicious. Plus, now that its cold outside here, soup is the perfect treat to warm me up. Creamy Potato Soup Recipe Print ... [ Read More ]